Maintaining a Honda portable generator isn't just about keeping it running; it's about safeguarding your peace of mind when the power goes out, extending your investment's lifespan, and ensuring it performs reliably when you need it most. This isn't just a chore list; consider this your definitive Maintenance Guide for Honda Portable Generators, a practical playbook to ensure your trusty power companion is always ready for action.
Forget the days of frantically pulling a cord, only to be met with a stubborn silence. With a little consistent care, your Honda generator will be a beacon of dependability, humming to life with ease, whether you're camping, powering a job site, or weathering a storm. Let's make sure it never lets you down.
At a Glance: Your Generator Maintenance Cheat Sheet
- Read Your Manual: Always the #1 rule. Every model is slightly different.
- Fresh Fuel is Key: Old, ethanol-heavy fuel is a generator's worst enemy. Stabilize or drain.
- Regular Oil Changes: Critical for engine health. Check before every use.
- Clean Air Filter: Ensures proper combustion and power output.
- Spark Plug Check: Essential for reliable starting and efficient running.
- Storage Prep: Never put a generator away for months without proper shutdown procedures.
- Safety First: Always disconnect the spark plug before any service.
Why Your Generator Deserves the VIP Treatment
Think of your Honda portable generator as the dependable friend who always shows up when you need them. But even the best friends need a little looking after. Skipping maintenance on these machines is a gamble. At best, you'll experience reduced performance, struggling to power even basic appliances. At worst, you could face costly repairs, a complete breakdown during a critical outage, or even safety hazards.
Honda generators are renowned for their quality and longevity, but that reputation is earned through smart engineering and owner diligence. A well-maintained generator starts easier, runs cleaner, uses less fuel, and lasts significantly longer. It's an investment in uninterrupted power, and a small amount of preventative care pays massive dividends.
Your Owner's Manual: The Unsung Hero
Before you even think about grabbing a wrench, grab your owner's manual. Seriously. While this guide offers comprehensive best practices applicable to most Honda portable generators, specific models (like the popular EU series, the robust EM series, or the industrial EB series) can have unique quirks, recommended oil types, service intervals, and diagnostic procedures.
Consult your specific model's owner's manual—easily found on the official Honda Power Equipment website or comprehensive sites like ManualsLib. These resources offer detailed, model-specific instructions and diagrams that are invaluable. Think of this guide as the overarching philosophy, and your manual as the precise instruction set for your machine.
The Foundation: Essential Pre-Operation & Post-Use Checks
Many major problems can be averted with a few quick checks before you start your generator and a bit of care after you shut it down.
1. Fuel System Vigilance
Fuel is the lifeblood of your generator, but it can also be its downfall. Modern gasoline, especially blends containing ethanol, degrades quickly and can wreak havoc on small engines.
- Before Use:
- Check Fuel Level: Obvious, but often overlooked. Never let it run completely dry if you can avoid it, as this can sometimes pull sediment into the fuel lines.
- Inspect Fuel for Freshness: If the fuel in the tank has been sitting for more than a month without a stabilizer, or looks discolored or murky, drain it and refill with fresh, ethanol-free (if possible) gasoline.
- Fuel Stabilizer: If you anticipate infrequent use, or if the fuel will sit for more than a few weeks, add a quality fuel stabilizer like STA-BIL or Seafoam to a full tank of fresh gas. Run the generator for 10-15 minutes to ensure the treated fuel circulates through the carburetor.
- After Use (especially before storage):
- Long-Term Storage (over 30 days): The safest bet is to drain the fuel tank completely and then run the generator until it runs out of fuel. This ensures the carburetor bowl is also dry, preventing gummy deposits. Consult your manual for the exact draining procedure.
- Short-Term Storage (under 30 days): If using fuel stabilizer, ensure it's circulated.
2. Engine Oil: The Heart's Lubricant
Engine oil keeps moving parts friction-free and cool. Neglecting oil changes is a surefire way to shorten your generator's life.
- Before Every Use:
- Check Oil Level: Ensure the generator is on a level surface. Remove the dipstick (or oil filler cap), wipe it clean, reinsert it without screwing it in (most Honda models), then remove and check the level. It should be between the "full" and "add" marks.
- Top Up if Needed: Use the correct viscosity oil specified in your owner's manual (e.g., 10W-30 for general use, different weights for extreme temperatures).
- After First 20 Hours (Break-In): This is critical! The first oil change removes metallic particulates from the engine's initial wear-in period.
- Every 50-100 Hours (or Annually): Change the oil regularly. Even if you don't hit the hour mark, moisture and contaminants can build up over time. Change it at least once a year.
3. Air Filter: The Engine's Lungs
A clean air filter is vital for proper combustion. A dirty filter chokes the engine, leading to reduced power, increased fuel consumption, and potentially carbon buildup.
- Before Each Use (Quick Check): Visually inspect the air filter cover. If it looks visibly dusty or clogged, it's time for a proper inspection.
- Every 50 Hours (or Monthly/Seasonally): Remove the air filter cover.
- Foam Filter: Wash in warm, soapy water, rinse thoroughly, squeeze dry, then lightly coat with clean engine oil and squeeze out excess.
- Paper Filter: Tap it gently to dislodge dirt. If it's heavily soiled, torn, or damaged, replace it. Never wash a paper filter with water.
- Both Types: Replace if damaged.
4. Spark Plug: The Ignition Point
A healthy spark plug ensures easy starting and efficient fuel burn.
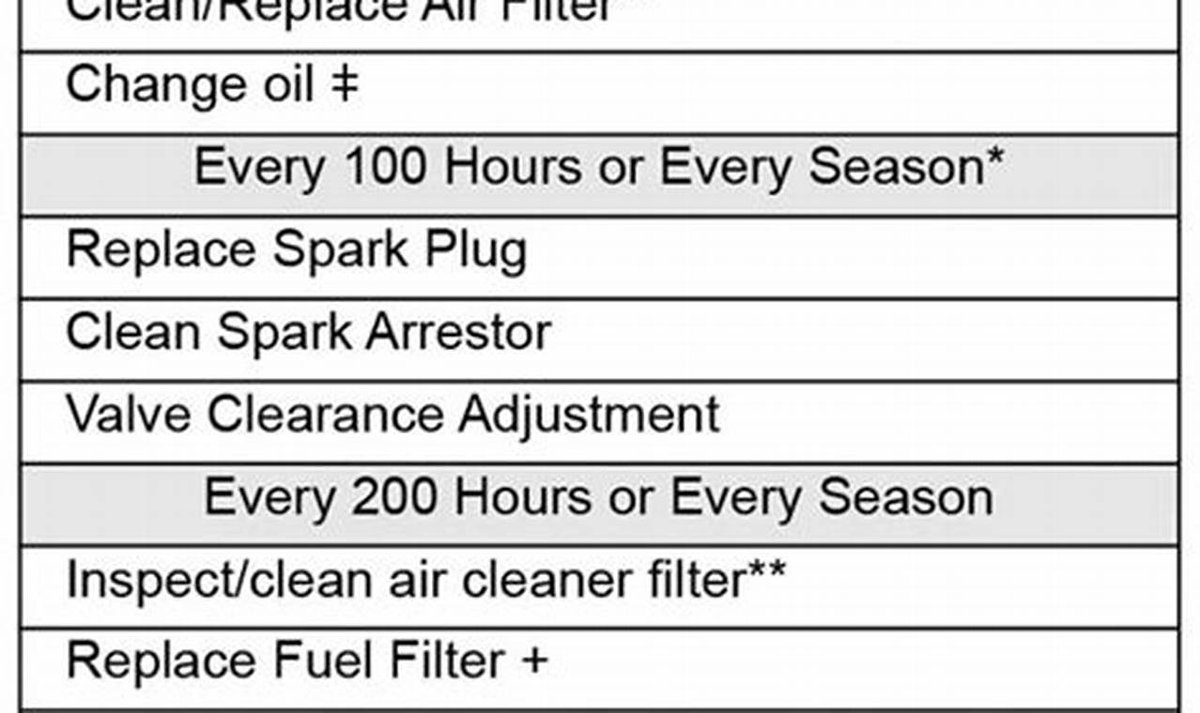
- Every 100 Hours (or Annually):
- Inspect: Remove the spark plug (always disconnect the spark plug cap first!). Look for fouling (black, sooty deposits), wear, or damage to the electrode.
- Clean: If lightly fouled, gently clean with a wire brush.
- Gap: Check the electrode gap with a feeler gauge. Adjust if necessary to your manual's specification (usually around 0.028-0.031 inches).
- Replace: If heavily fouled, worn, or damaged, replace it with the exact type recommended by Honda.
5. Exhaust System: Clear the Path
A blocked exhaust can cause back pressure, reducing power and potentially overheating.
- Periodically: Visually check the muffler and exhaust outlet for any obstructions (e.g., mud dauber nests, debris). Ensure the spark arrestor screen is clean; remove it and clean with a wire brush if necessary.
6. General Inspection: The Once-Over
A quick look can catch minor issues before they become major problems.
- Before Each Use:
- Check for Leaks: Look for oil or fuel leaks around the engine and fuel tank.
- Tighten Fasteners: Vibrate loose? Gently check engine mounting bolts, handles, and other accessible fasteners.
- Inspect Cords & Plugs: Ensure power cords and electrical outlets on the generator are in good condition.
Deep Dive: Step-by-Step Maintenance Procedures
Now, let's get into the specifics of the most common tasks.
Changing the Engine Oil: A Step-by-Step Guide
This is arguably the most important regular maintenance task.
- Warm It Up (Briefly): Run the generator for 5-10 minutes to warm the oil. Warm oil drains more completely, carrying away more contaminants.
- Safety First: Turn off the engine. Disconnect the spark plug cap to prevent accidental starting. Place the generator on a level surface.
- Position for Drainage: Most Honda generators have a drain plug near the bottom of the crankcase. Tilt the generator slightly (if necessary and safe) to allow full drainage.
- Drain the Old Oil: Place a suitable drain pan underneath the oil drain plug. Remove the oil filler cap/dipstick first (this allows air in for smoother drainage), then remove the drain plug. Allow all the old oil to drain completely.
- Re-Install Drain Plug: Once drained, re-install the drain plug securely. Do not overtighten.
- Refill with Fresh Oil: Refer to your owner's manual for the exact oil capacity and recommended oil type (usually 10W-30 for general use, but check for temperature variations). Slowly pour in the new oil.
- Check Level: Use the dipstick (or check the filler neck level if no dipstick) to ensure the oil is at the "full" mark. Do not overfill.
- Replace Cap: Re-install the oil filler cap/dipstick.
- Reconnect Spark Plug: Reconnect the spark plug cap.
- Dispose Responsibly: Take the used oil to an approved recycling center. Never dump it.
Servicing the Air Filter: Breathing Easy
A clean air filter is crucial for engine efficiency.
- Locate & Remove: Find the air filter housing (usually a plastic box on the side of the engine). Unclip or unscrew the cover to expose the filter element.
- Identify Filter Type:
- Foam Filter: These are often reusable. Wash it gently in warm water with a mild detergent. Rinse thoroughly until the water runs clear. Squeeze out as much water as possible. Allow it to air dry completely. Then, apply a thin, even coating of clean engine oil, and gently squeeze the filter again to distribute the oil and remove excess. The filter should feel slightly damp, not dripping wet.
- Paper Filter: These are usually disposable. Tap it gently on a hard surface to dislodge loose dirt. Hold it up to a light source – if you can't see light through it, or if it's torn, oily, or heavily clogged, it needs to be replaced. Never try to wash or blow compressed air directly into a paper filter, as this can damage the fibers.
- Inspect Housing: While the filter is out, wipe any dust or debris from inside the air filter housing.
- Reinstall: Place the clean/new filter back into the housing. Ensure it seats properly. Reattach the cover securely.
Spark Plug Inspection and Replacement: Igniting Performance
A good spark plug ensures a powerful, consistent spark.
- Safety First: Disconnect the spark plug cap.
- Remove Plug: Use a spark plug wrench (often included in your generator's tool kit) to carefully unscrew the spark plug.
- Inspect: Examine the electrode and insulator.
- Normal: Light tan or gray deposits.
- Fouled: Black, sooty deposits (rich fuel mixture, dirty air filter), or white/blistered (overheating, lean mixture).
- Worn: Rounded electrodes, excessive gap.
- Clean (if reusable): If only lightly fouled, gently clean the electrodes with a wire brush.
- Check Gap: Use a spark plug gap gauge (feeler gauge) to measure the distance between the center and side electrodes. Compare this to your manual's specification (e.g., 0.028-0.031 inches). Gently bend the side electrode if adjustment is needed.
- Replace (if needed): If the plug is heavily fouled, worn, or if cleaning doesn't restore it, replace it with a new plug of the exact type specified by Honda.
- Install New/Cleaned Plug: Hand-thread the spark plug into the cylinder head to avoid cross-threading. Once finger-tight, use the wrench to tighten it. Don't overtighten; a new plug usually requires about a 1/2 to 3/4 turn after seating, while an old plug needs about 1/8 to 1/4 turn.
- Reconnect Cap: Firmly push the spark plug cap back onto the plug.
Fuel System Management: Fighting the Ethanol Battle
Fuel-related issues are the leading cause of generator problems.
- Use Fresh Fuel: Always start with fresh, clean gasoline. Purchase it in small quantities to minimize storage time.
- Ethanol-Free Preferred: If available, use gasoline without ethanol. Ethanol attracts water, degrades rubber and plastic components, and can create corrosive deposits.
- Fuel Stabilizer: For any fuel that will sit for more than a couple of weeks, add a quality fuel stabilizer (like STA-BIL or Seafoam). Follow the product's directions. Crucially, run the generator for at least 10-15 minutes after adding stabilizer to ensure it circulates through the entire fuel system, especially the carburetor.
- Carburetor Drain: For long-term storage (over 30 days), draining the carburetor is paramount.
- Turn the fuel valve to the "OFF" position.
- Place a small, approved fuel container under the carburetor's drain screw (usually a small screw with a hose nipple on the bottom of the carburetor bowl).
- Loosen the drain screw to allow fuel to flow into the container.
- Once empty, tighten the drain screw securely.
- Run the generator until it completely runs out of fuel and stops. This ensures the last bit of fuel in the lines and carburetor is consumed.
- Fuel Filter: Some Honda models have an in-line fuel filter. Consult your manual for its location and recommended inspection/replacement interval. Clogged fuel filters can cause power loss or starting issues.
Battery Care (for Electric Start Models): Keeping the Spark Alive
If your Honda generator features electric start, the battery needs attention too.
- Check Terminals: Periodically inspect battery terminals for corrosion. Clean them with a wire brush if necessary.
- Charge: If the generator sits for extended periods, the battery can lose its charge. Use a trickle charger or battery maintainer to keep it topped off. Never use an automotive charger on a small generator battery, as it can overcharge and damage it.
- Winter Storage: If storing in cold temperatures, it's often best to remove the battery and store it in a warmer location on a trickle charger.
When to Call a Pro: Knowing Your Limits
While much routine maintenance is DIY-friendly, some tasks are best left to a certified Honda technician.
- Valve Clearance Adjustment: This is a precision job that requires special tools and expertise. If your generator is hard to start, running rough, or making unusual noises even after basic maintenance, incorrect valve clearance could be the culprit.
- Major Engine Repairs: Beyond basic component replacement, significant engine work, internal diagnostics, or any issue requiring specialized tools or knowledge should be handled by a professional.
- Persistent Electrical Issues: If you're experiencing consistent electrical problems (e.g., no power output, flickering lights, strange readings) that aren't tied to simple loose connections or tripped breakers, a professional diagnostic is wise.
- Strange Noises or Vibrations: Any new, persistent, or alarming noises or vibrations could indicate a serious internal problem. Don't ignore them.
A good rule of thumb: If you're unsure, or if the repair involves going beyond readily accessible components, call a Honda-authorized service center. For general information on Honda models, including how various systems work, you might find valuable context in a resource like this Honda 2000 watt generator guide, which often covers general operating principles that apply across the brand.
Essential Tools for Your Generator Maintenance Kit
Having the right tools makes maintenance easier and safer.
- Spark Plug Wrench: Often supplied with your generator.
- Feeler Gauge: For checking spark plug gap and potentially valve clearance (though for valves, professional tools are better).
- Socket Wrench Set: For various bolts, especially oil drain plugs.
- Screwdriver Set: Flathead and Phillips for covers, clamps.
- Drain Pan: For collecting used oil and fuel.
- Funnel: For mess-free oil and fuel filling.
- Fuel Stabilizer: Essential for fuel longevity.
- Clean Rags: For spills and cleaning.
- Wire Brush: For cleaning spark plugs and battery terminals.
- Torque Wrench (Optional but Recommended): For tightening bolts to precise specifications, especially the spark plug.
- Eye Protection & Gloves: Always for safety!
Long-Term Storage: Protecting Your Investment
Proper storage is key to a generator that reliably fires up season after season.
- Fuel System Prep: This is the most critical step. Either:
- Drain the fuel tank and carburetor completely (as described above), OR
- Fill the tank with fresh fuel mixed with a quality fuel stabilizer, then run the generator for 10-15 minutes to circulate the treated fuel.
- Change the Oil: It's best to store your generator with fresh oil. Contaminated oil can become acidic over time, causing internal engine corrosion.
- Remove Spark Plug: After changing the oil, remove the spark plug. Pour about a teaspoon of clean engine oil into the cylinder (through the spark plug hole). Slowly pull the recoil starter cord a few times (with the spark plug out and cap disconnected) to distribute the oil and coat the cylinder walls. This prevents rust during storage.
- Reinstall Spark Plug: Reinstall the spark plug and reconnect its cap.
- Clean Exterior: Wipe down the generator's exterior to remove dirt, grease, and debris. This helps prevent corrosion and makes it pleasant to use next time.
- Battery Care (Electric Start): Remove the battery (if applicable) and store it in a cool, dry place. Connect it to a trickle charger or battery maintainer to prevent discharge.
- Cover: Use a breathable generator cover to protect it from dust and moisture.
- Storage Location: Store in a dry, well-ventilated area, away from direct sunlight, corrosive chemicals, and potential ignition sources. Never store a generator with fuel indoors or near living spaces.
Keeping Your Power On: The Final Word
Your Honda portable generator is an investment in self-reliance, a promise of power when the grid lets you down. Treating it with consistent, proactive maintenance isn't just about preserving its mechanics; it's about preserving your peace of mind. By following these guidelines, respecting your owner's manual, and never cutting corners, you'll ensure your Honda generator remains a steadfast, ready-to-work powerhouse for years to come. Don't wait for an emergency to discover it's too late – give your generator the care it deserves, today.